Archived, read-only copy of the Vivarium Forum (2006 to 2014). Posts belong to their original authors.

Limited Guest Access ... Welcome to the Vivarium Forums. You are currently viewing our boards as a GUEST, which gives You very limited access and no posting privileges. Register and gain full access to everything on the site. Vivarium Forum membership is completely free with no tricks or gimmicks. If you have any problems with the registration process or your account login, please contact support.

Go Back   Vivarium Forums > PALUDARIUM > Paludarium > Palu-Construction


Reply
 
LinkBack Thread Tools Display Modes
  #1  
Old 02-27-2011, 09:01 AM
Chasing Crickets
 
Join Date: Apr 2010
Posts: 30
evilhorde is on a distinguished road
Default Lurking no longer.

Hello everybody,
I am new to this so please try to be gentle if I have made some monumental error in my designs. I haven't hurt anybody yet, but the end result is to hurt lots of somebodys but in a natural kind of way.
This all started with a gift from my mother.

My mother made the mistake of leaving a valuable family heirloom at my house for too long. I used to store my collection of stubby beer bottles in it but I was feeling inspired and decided that it would be better to store plants in it.
Here is the valuable particle board china cabinet.

This drawing has been met with mixed reviews. Some people find that it helps to explain what I am doing, some folks just get more confused.
The green is water flow and the orange is a glass fish tank. The three drawings on the right are the individual shelves from a top view persective. They show the stream in the top tray and the lake in the middle. The very bottom of the cabinet will house a tank to hold extra water for the pump and to catch whatever falls out the bottom.

All of the trays will have an inch or so of rock, with a layer of spaghnum peat above that and then a layer of top soil. If I get the water level just right, I should be able to water all the plants from the underground water flow without drowning or drying anything to much. This pic is the mostly complete mechanical end of things.

Lets take a trip around and see where the water is supposed to go.
This picture is both the start and the finish. Through the drainhole a 1/2 hose is going to carry water up to the very top tray. Eventually, when the water flows up into the middle tray it will waterfall here back into the sump below.

The hose will go to a nipple on the underside of the top trayand it will blast away away at a maximum of 250 GPH iside of this box:

In order to get a pump that could lift water as high as I needed to, I had to buy a huge fountain pump. I was concerned about the raging torrent factor so I built this box that I can fill with rocks or whatever to break up the flow of water and to direct it to where I want it to go. The box will be buried in dirt with flora growing on it and the water will flow out of the side of the mountain and across this tray. The train will be static and will be coming out of a tunnel at the back of the 'mountain'. and in the foreground I will use a model building or two to hide the drain.

The depth of the water in this tray will be controlled by adding a piece of pipe over the drain hole as a weir. If I want it deeper, I will just silicone a taller piece of pipe in place. That drain hole goes to a piece of 3" pipe which will allow the water to flow past the middle level and straight to the bottom of the fish tank. At the bottom of the tank I have some screen and I will cover that in a few inches of lava rock.

The water will flow up through the porous rock and overflow into the tray above it.

This tray and the tank will be siliconed together.

The screening will keep the dirt and rock from falling through and the screen will have a hole cut into it over one of the square holes to create a 'lake' and to give me access to feed the fish.

And then tier 2 eventually fills up enough to spill out over the waterfall.

and then we are back at the start. In the waterfall area I will have large stones, a fern or two. I think I am going to use some ancient cedar shakes to line the walls of this thing to give it a more rustic look than I am getting with the green paint.

I can see already that lighting is going to be a major problem. Lighting the top tier will be easy with any aquarium light. I just need to cut a hole. The middle tier and the tank are another story. My original plan had a storage area where the waterfall is now and I was going to light the fish tank from the side. The plants were to get small spotlights hidden behind the wood of the doors. I may still be able to do that but I won't know until I see how bad the humidity gets with the waterfall in there. But that fish tank is going to be really dark.

That's all I have for now and I suspect it won't look a lot different for a while. Before I get planting, I have a lot more building and testing and probably rebuilding and more testing. I am already concerned with the lack of a way to clean the underside of the screen on tier 2.
Reply With Quote
  #2  
Old 02-27-2011, 09:08 AM
Chasing Crickets
 
Join Date: Apr 2010
Posts: 30
evilhorde is on a distinguished road
Default

Since writing that post I have discovered that the pump I bought is not narly powerful enough. It can pump water to that height but since it is at it's maximum, it barely even dribbles out. If I want any serious flow at that height I am going to need some serious pumping power. Not really a big deal, just a minor setback. This also will mean a larger hose and I have now decided that the new larger hose is going to be running up the outside rear of the cabinet. This means that tray# 3 is going to get a major redesign but i will keep the drain hole where it is so that it doesn't have to impact the rest of the system.

Another thing I don't like is how dark it is in the fish tank. I am trying to think up a way to light it from the back without blinding the fish or me when I look at it.
What do you think of this idea?

And if I set up the light this way, should I only run it as far as the end of the tank, or should I run it out behind the waterfall as well? I am thinking that I should cut it now and i can always cover it up, but once I glue the fishtank in, there will be no more cutting.

And the tank isn't actually 3 feet thick like it appears in the picture. I just couldn't find the undo button to fix the proportions so I left it like that.

edit: looking at that picture, I wonder if I shouldn't carry that light opening all the way up to light the land in tray#2 as well.
Reply With Quote
  #3  
Old 02-27-2011, 09:22 AM
Chasing Crickets
 
Join Date: Apr 2010
Posts: 30
evilhorde is on a distinguished road
Default

Now that the preamble is done, I am at the reason for being in a palu- forum.
My intentions for life in this cabinet are roughly as follows:
On tier#3 I will use overhead lighting to grow carnivorous plants and will have no access points for the animals. I suppose there are ways a determined critter could climb up and if it becomes a problem i will deal with it then, but it is to be considered 'movement free'.
On tier#2 and in the waterall area: unknown vegetation and possibly newt(s)/ salamander(s). I am hoping to get a land based creature or two that will swim and eat the fish in the tank below them. The 'pond' edges will be lined with moddelling clay and maybe some small round stones to protect their soft bellies from the edges of the aluminum screening. This will be under an inch or so of water and sloping up to the level of the dry ground so they should have easy ingress/egress.

fishtank: This is all mystery to me. I am not sure what fish would breed fast enough and move slow enough to feed that monster from above or if it will even come down to hunt. nor do I know what plants would be good or anything else. Access to the fishtank will be limited to whatever will fit into the lake opening so plants that require pruning probably won't be suitable.

DISCLAIMER: I fully intend to run this cabinet for a long while with just plants in it. When I get all the mechanical details nailed down and plants can survive both of my left thumbs, then I will consider adding animals. I am just posting about the animals now, in case there is something I need to consider in this construction phase that I am missing.

Last edited by evilhorde; 02-27-2011 at 09:26 AM..
Reply With Quote
  #4  
Old 02-27-2011, 12:33 PM
Chasing Crickets
 
Join Date: Nov 2010
Location: prague
Posts: 39
xashc200 is on a distinguished road
Default

really nice job, all the fittings look very clean..

i think if you try to light the fish tank from behind you will only get the shadow side of the fish not showing them to their full glory. perhaps it could look real nice if you make it a cave biotype tank. you could sculpt the cave walls complete with stallegtites and such and use submersible aquarium spot lights. then stock with blind cave fish, shrimp or one of those salamanders with their gills on the outside? just an idea. im sure you will come up with a solution to the lighting

looks brilliant anyway. i can't wait to see it planted
Reply With Quote
  #5  
Old 02-27-2011, 11:29 PM
Chasing Crickets
 
Join Date: Apr 2010
Posts: 30
evilhorde is on a distinguished road
Default

I had some google time today and came up with an idea that I like for the aquarium end of this.
I am thinking plant life like this:

Or this:

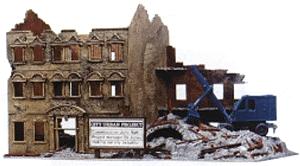
with a structure like this:

(without the excavator) I wonder if the building would give the feeder fish too much of a fair chance?
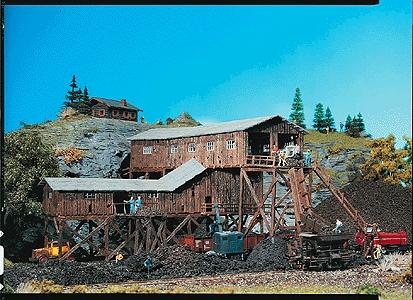
A model like this one would also look pretty cool, but it doesn't fit the tank.

Basically some sort of 'nature taking over' scene. I may try to include more 'human interference' on the other levels as well. Something to make the cute little newt more monstrous.

Because of my reverse water flow through the tank, if I want to put real plants in there I will have to make 'vents' for the water to flow up so that it doesn't just push the soil away and float the plants to the top. But that should be easy enough to do. I can drill holes under the building and send most of the water up through it. A few bubbles and it will probably add to the 'end of the world' effect. As long as I make enough flow areas and give the plants a little time to root in before I start the water flowing through, it should hold shouldn't it? I am going to plumb a couple of different bubbler lines under the gravel when I put it together just in case I want to add bubbles later. Running the lines now is easy, later on will be a nightmare so even if i don't use them, I am plumbing them now.
Reply With Quote
  #6  
Old 03-12-2011, 12:19 AM
beckdg's Avatar
Moderator
 
Join Date: Oct 2008
Location: south eastern pa
Posts: 7,026
beckdg has a reputation beyond reputebeckdg has a reputation beyond reputebeckdg has a reputation beyond reputebeckdg has a reputation beyond reputebeckdg has a reputation beyond reputebeckdg has a reputation beyond reputebeckdg has a reputation beyond repute
Default

i've got to get back to this, so i'm subscribing.
__________________

kill the python, boa and anaconda ban

1.0.0 columbian red-tail boa - p.j.! 55 gal planted fish tank 0.0.3 hermit crabs

like dart frogs? sign up on dartfrogz.com and be sure to put leapinglizard in the referral box.

http://www.kill-rulechange.com/
Reply With Quote
  #7  
Old 03-12-2011, 12:42 AM
Chasing Crickets
 
Join Date: Apr 2010
Posts: 30
evilhorde is on a distinguished road
Default

I decided that it was far too dark for anything to ever grow so I removed the back and replaced it with a sheet of anodized aluminum set on an angle to reflect light from above similar to the crappy sketch above. I have set the lights up higher and I hope to get good light on the second tier plants.

Much brighter, you would have to agree. Maybe a trifle sterile, but bright.
For light I have chosen to go with compact flourescents. I saw a bathroom fixture at the local Home Depot and knew I had my easy solution.
I made up a couple of hoods to mount them and I think they should do.


That's it for now.
Reply With Quote
  #8  
Old 03-12-2011, 07:06 PM
Chasing Crickets
 
Join Date: Apr 2010
Posts: 30
evilhorde is on a distinguished road
Default

This is a pretty cool looking tank. Thought I might share it.
Reply With Quote
  #9  
Old 03-27-2011, 01:53 AM
Chasing Crickets
 
Join Date: Apr 2010
Posts: 30
evilhorde is on a distinguished road
Default

Not a lot has changed as far as pictures are concerned, but I have made progress. The tank is siliconed in place, all the plumbing is done and I have one light fixture wired in.
With two lightbulbs it looks like this:

and with the door on it looks like this:

And although you can't tell in the picture, here is a running waterfall.

The water is awfully murky, I am going to have to implement some sort of inline water filter to get the lava rock dust out of there. I washed it with clean water but there is still a lot of fine particulate coming out of it.
Reply With Quote
  #10  
Old 03-27-2011, 10:28 PM
Chasing Crickets
 
Join Date: Apr 2010
Posts: 30
evilhorde is on a distinguished road
Default

A few more pictures for today.


Reply With Quote
Reply


Currently Active Users Viewing This Thread: 1 (0 members and 1 guests)
 
Thread Tools
Display Modes

Posting Rules
You may not post new threads
You may not post replies
You may not post attachments
You may not edit your posts

BB code is On
Smilies are On
[IMG] code is On
HTML code is Off
Trackbacks are On
Pingbacks are On
Refbacks are On


All times are GMT -4. The time now is 10:58 AM.
Powered by vBulletin® Version 3.8.1
Copyright ©2000 - 2011, Jelsoft Enterprises Ltd.
Search Engine Optimization by vBSEO 3.6.0
(c) Vivarium Forum 2006-2007Ad Management plugin by RedTyger