|
|
|
Limited Guest Access ... Welcome to the Vivarium Forums. You are currently viewing our boards as a GUEST, which gives You very limited access and no posting privileges. Register and gain full access to everything on the site. Vivarium Forum membership is completely free with no tricks or gimmicks. If you have any problems with the registration process or your account login, please contact support.
|

03-08-2010, 05:08 PM
|
 |
Addicted
|
|
Join Date: Dec 2009
Location: Edmonton, Canada
Posts: 922
|
|
Im trying to plan ahead for problems like that...The cave will be covered using black window mesh and will be able to fold out of the way incase I need to get at the pump.
Plus I'm pretty sure this tank will house RETF's so they wont spend to much time on the ground.
|
03-08-2010, 10:14 PM
|
|
Addicted
|
|
Join Date: Dec 2009
Location: Edmonton, Canada
Posts: 922
|
|
Quote:
Originally Posted by Epiphile

Looks great- how about an updated shot of the first one while you've got the camera out?
|
Hey bud...Just updated my 1st vivarium build if you want to check out a few pics...I dont want to clutter this build with the past hahaha  |
03-08-2010, 10:35 PM
|
|
Addicted
|
|
Join Date: Dec 2009
Location: Edmonton, Canada
Posts: 922
|
|

Heres some updated pics of my work from yesterday and tonight...
Now Im sure my vague descriptions will come together for you guys.....I hope lol
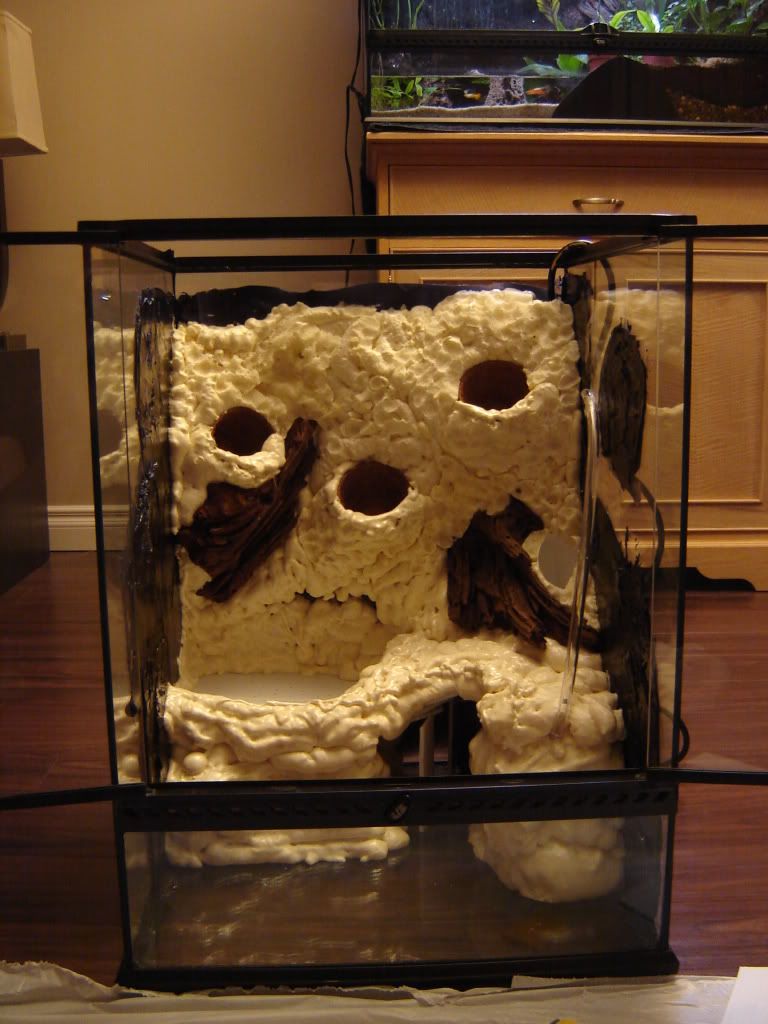
Here is a close-up of the cave...So far I have a pump underneath the overhang and there is still a lot of room back there. Hopefully once all the foaming/carving is done I will be able to snugly fit a filter in aswell. I am using a type of "plastic cardboard" for support. Once it is all dry I will then take the support legs out.

And here is where the planted land area will be. I also used the plastic cardboard here. I punched a bunch of holes in it before placing it inside the foam. Also once it has finished curing I will punch a larger hole at the lowest point of the plastic. Then before I add my rocks/substrate I will add a piece of window mesh to make sure no substrate falls into the water.
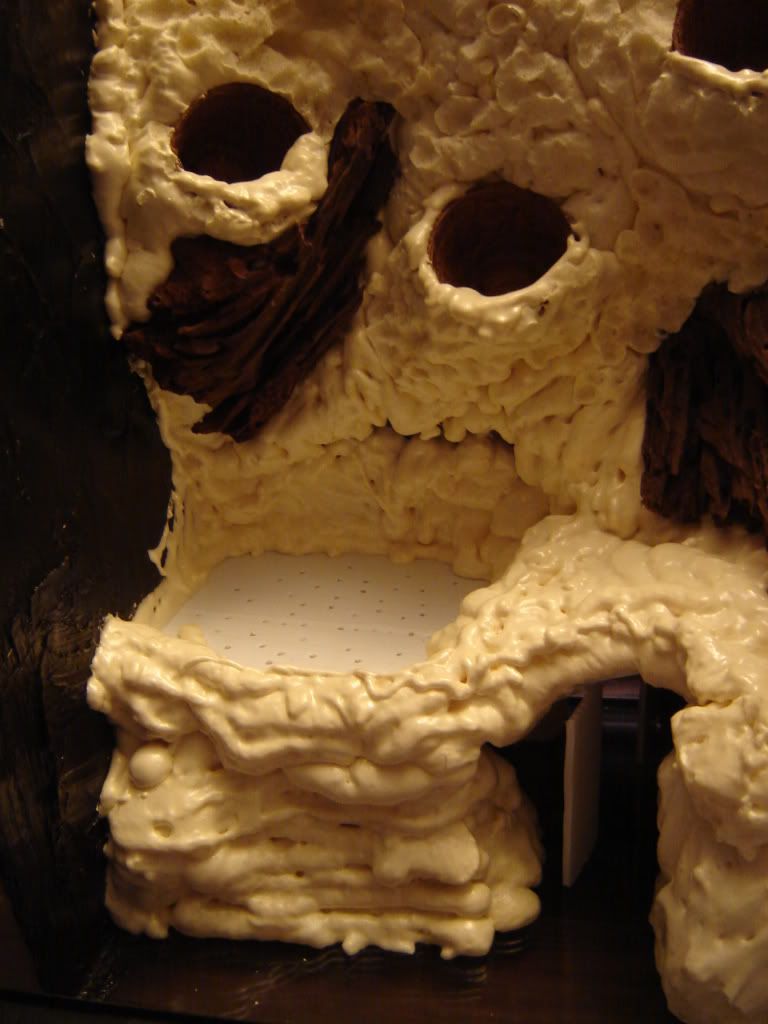
I will probably get some criticisms for not creating a false bottom using egg crate...I did go to 2 of the stores on the "Good Places to Buy" list but they had no clue what I was talking about. However Im confident my solution will be a safe and stirdy substitute.
Last edited by Grimm; 03-08-2010 at 11:40 PM..
|
03-08-2010, 11:55 PM
|
 |
Administrator
|
|
Join Date: Apr 2008
Location: Lake Stevens, WA
Posts: 6,059
|
|
It probably won't drain as well, but it should work. We all could have told you that no one in the store will know what the heck you are talking about. It's in the lighting section. Next time, ask for the light diffusers.
It looks good. I can't wait to see it finished.
__________________

|
03-09-2010, 12:11 AM
|
|
Addicted
|
|
Join Date: Dec 2009
Location: Edmonton, Canada
Posts: 922
|
|
OMG LIGHT DIFFUSERS!!! Why didnt I think of that! All I did back in school was look at the walls and ceilings instead of the white board so I should have put 2 & 2 together!
I dont think it will matter that much...Its only one small section anyways and once the foam cures I will be punching a lot more holes in it. I purposely gave it a small slant also to prevent any water from sitting on the flat sections between holes.
A woman I work with is letting me borrow her Dremmel tool so once I finish all the major foaming (by tomorrow night hopefully) I'll be goin' to town and making the lower sections look like stone.
|
03-09-2010, 02:37 AM
|
|
Administrator
|
|
Join Date: Apr 2008
Location: Lake Stevens, WA
Posts: 6,059
|
|
I think the reason you didn't think of it is that they don't look the same when they're in the ceiling. They look almost solid in the ceiling.
It's good that you slanted it, that should keep the water from sitting.
Where'd you get the coroplast from? I think it is a viable option for cage construction (at least for toppers). How much was it?
How are you planning to cover the foam in this one? I can't remember if you said.
__________________
|
03-09-2010, 07:22 AM
|
 |
Obsessed
|
|
Join Date: Sep 2009
Location: Toronto, ON
Posts: 1,418
|
|
This is getting good, Grimm. I think the material you chose, if it drains well, is probably at least as good as egg crate. Good on you for thinking outside of the box that we seem to have made for ourselves.
__________________
Aaron
Selling my collection for a plane ticket to Ecuador- PM for details.
|
03-09-2010, 11:29 AM
|
|
Addicted
|
|
Join Date: Dec 2009
Location: Edmonton, Canada
Posts: 922
|
|
I actually bought it from Home Depot...Its not exactly cheap but it was my last option. A 2'x4' piece of it was 11$...And I believe a 4'x8' was around 20. Im not sure how expensive light difusers usually are but this may be cheaper. It is actually quite strong for how little it weights and it can be bent along the inner pleats (Just like the grain of cardboard)
The only PITA about the stuff it that you have to punch holes in it. It isnt very difficult however if someone is going to try and make a false bottom from this material I suggest buying a single hole punch.
And Froggy...I am borrowing a dremmel today so I am planning to make the lower section look like rock using concrete or some type of grout, followed by paint and a protective layer. I will do the old fashion silicone/co-co fiber methode on the upper portions. To make this look more natural I will try sticking small rocks and some dried moss into the co-co mix. Also to make it more natural I will add the silicone and co-co ontop of the concret in the small grooves and cracks between my sculpted rocks.
Im going to look at a lot of pictures of natural streams and waterfalls so I get a good idea of what looks realistic and aged. All I need to do now is figure out what type of paint is safe to use, asweel as the protective coat, and where to get these products. Shouldnt be to difficult.
Last edited by Grimm; 03-09-2010 at 11:39 AM..
|
03-09-2010, 01:02 PM
|
 |
Eager to Learn
|
|
Join Date: Feb 2010
Location: Minooka, IL
Posts: 256
|
|
Wow, Looking nice!
__________________
"The only thing they can get me for is running a funeral parlor without a license" - Gacy
1.0.3 Varadero Imitators
0.0.3 Cainarachi valley imitators
Check out www.dartfrogz.com 
|
03-09-2010, 06:08 PM
|
|
Administrator
|
|
Join Date: Apr 2008
Location: Lake Stevens, WA
Posts: 6,059
|
|
I'm not sure if it will leach into the water or not (it should be easy enough to test), but I used Krylon Fusion to paint my foam topper for the CWD (did you see the update on the thread?). It's safe for plastics, so it won't melt the foam. I'm REALLY happy with how it turned out. It looks great. Plus, I can just cut a small x in the surface of the foam and press in plants if I want to mount any. It also absorbs water when misted, then releases it back into the air, helping keep the humidity high without having to have super wet substrate. If you test some of the Krylon Fusion to see if it washes away/leaches into the water, you might be able to just paint it without sealing it, that way you can eventually have some moss or riccia growing up the foam that's in the water. The krylon fusion comes in a huge variety of colors, you could mix them to make it look like just about any type of surface. You might even see if they make it in a jar instead of just a can. Of course, you can also use acrylic paints, but you'll definitely have to seal that, IMO. Acrylic often washes off under water. I don't know though... It might not, since the foam will absorb the paint. Just make sure you sand/carve all of the skin off the foam before you paint it.
As for your upper regions, I think you'll be more happy with another method. You could try painting it, covering it in concrete, or even using the concrete binder method (I really like this method, but it can't be used where it will be constantly wet, it needs to be able to dry out or it will fall apart, IME). There is another method I would also like to try, it uses TiteBond III Ultimate Wood Glue much the same way the concrete binder is used, except it's waterproof.
I think that all of these methods look much more natural that the silicone method. They also take less time to cure (except the concrete, depending upon application) and are easier to apply. With the concrete binder/Titebond III method, you can achieve a huge variety of looks just by changing the mix you add to the binder. You can use peat/coco fiber, sand, soil, etc.
__________________
|
|
Currently Active Users Viewing This Thread: 1 (0 members and 1 guests)
|
|
|
| Thread Tools |
|
|
| Display Modes |
 Linear Mode
|
 Posting Rules |
You may not post new threads
You may not post replies
You may not post attachments
You may not edit your posts
HTML code is Off
|
|
|
All times are GMT -4. The time now is 06:42 AM.
Powered by vBulletin® Version 3.8.1 Copyright ©2000 - 2010, Jelsoft Enterprises Ltd.
Search Engine Optimization by vBSEO 3.3.0
(c) Vivarium Forum 2006-2007Ad Management plugin by RedTyger
|


